Keep Your Engine Running Smoothly: 5 Easy Steps to Check Your Car’s Engine Oil Like a Pro!
This post includes affiliate links, which means that if you make a purchase after clicking on my links, I will receive a commission for the sale.

Are you afraid to change the oil in your car’s engine?
Are you unsure whether it is time to replace your vehicle’s oil?
If that is the case, there is no need for you to be concerned about anything. I am eager to be of assistance to you!
When we talk about oil, we can say that “Oil is the lifeblood of the engine in your vehicle” because oil helps reduce the amount of friction that occurs in your engine, which in turn helps your engine function smoothly. Because of the significant part it plays, it is important to check the oil level in your vehicle’s engine regularly.
Those who aren’t acquainted with the maintenance of their vehicles, on the other hand, might question whether or not it’s really necessary to check their oil on a regular basis. Because of this, the subject for today is checking the oil, and the article is broken up into two primary sections. In this first section, we are going to speak about how important it is to check the oil. Following that, we will proceed to the second portion, and in this part, I will walk you through the five steps necessary to check the engine oil in your vehicle.
Why it is important to check your car engine oil?
The substance known as “oil” is what is used to lubricate all of the metallic components in your vehicle and reduce the amount of friction that the moving components experience so that they do not wear out as quickly.

Oil not only keeps the moving parts of your vehicle’s engine lubricated, but it also protects against heat and friction, the two main foes of any motor. These two foes have the potential to cause wear, which will ultimately result in the destruction of your powerplant. Because friction and heat cause the oil to degrade over time, the engine oil and filter both need to be changed on a frequent basis.
It is recommended by the majority of user manuals for automobiles that you replace your oil filter somewhere between every 3,000 and 5,000 miles. After a sufficient amount of time has passed, the compounds in the oil degrade, causing the oil to become thick, dark, and vile. As a result, you need to regularly replace your oil in order to maintain its function. In addition to this, the oil is formulated to dissipate the heat and stop the engine from exploding! Not only does oil prevent the engine from overheating, but it also serves to keep the engine clean by preventing dirt from building up in the engine.
It is one of the most essential steps you can take to extend the life of your vehicle, and that is to change the oil in the engine. If you check the amount and condition of your engine oil on a regular basis, you can keep yourself apprised of what takes place to the oil in the engine of your vehicle and be reminded of the significance of this component of routine maintenance. Therefore, make it a habit to inspect the level of engine oil in your vehicle at least once a month, if not every time you load up the gas tank. Another option is to affix a note to the inside of your windshield so that you are constantly reminded of when it is time to replace your oil. It is highly likely that you will end up needing to transport your vehicle into a garage if you wait a significant amount of time between checking the oil in the engine of your vehicle.
Steps to check your car engine oil?
Keeping an eye on the amount of oil in your vehicle is one of the most important things you can do to extend its lifespan. The best method to ensure that your vehicle’s engine will continue to function properly for a significant amount of time into the future is to perform routine checks to determine whether or not it has the appropriate amount of oil. In addition, because it is a task that is both rapid and uncomplicated, performing routine checks on the engine of your vehicle is a non-issue. In this section, I will walk you through the process of checking your engine oil by outlining the five steps you need to take and the things you need to keep in mind while doing so. You will only require a rag or paper towel and the owner’s handbook that came with your vehicle. However, before you verify, you need to keep in mind the following four things:
– The vehicle is on level ground
You should position your vehicle on a surface that is as level as possible before checking the oil in it.
- You carry out these steps in order to acquire a precise measurement from the dipstick. The reading on the dipstick might be off, for instance, if the vehicle is parked on a slope.
- If you do this, you can prevent the oil from pooling on one edge of the pan, which can result in a reading that is slightly off.
– Engine is off
Wait at least ten minutes before checking the oil, or make it a point to do it when the engine is cool.
- DO NOT CHECK THE ENGINE OIL WHILE THE VEHICLE IS BEING DRIVEN.
- Check to see that the engine has not been started and allowed to operate for more than a few minutes.
- Wait a few minutes before checking the oil to make sure that any oil that may be near the top of the engine can make its way all the way down to the bottom.
– Refer to your owner’s manual
Check the owner’s handbook, and make sure to follow any instructions provided by the manufacturer.
There are some newer vehicles on the market that have electronic oil monitors rather than the more conventional dipsticks for manual checks.
– Pop the hood
That wraps up everything you need to know about the requirements to inspect the oil in a car’s engine. If you have completed all of the tasks mentioned above, then we can proceed to the five primary stages.
1. Locate engine oil dipstick
Dipstick: a rod with a graduated scale that is used to measure the profundity of a liquid, most commonly the amount of oil in an automobile’s engine.

Your vehicle may have a transverse engine (front-wheel drive) or an in-line engine (rear-wheel drive), both of which require a different position for the oil dipstick. (front-wheel drive). In most cases, the part of the dipstick that is visible in the engine compartment is the handle end. This part resembles a yellow plastic band and is engraved with the words “Engine Oil.”
FRIENDLY REMIND: Make sure you don’t get the dipstick for the transmission confused with the one for the engine. Check the user handbook that came with your vehicle to see which dipstick is connected to the oil tank. Alternatively, you can ask an employee at the gas station for assistance if you are still unsure.
2. Pull out the dipstick and wipe the end clean with a rag

3. Reinsert the dipstick into the engine until it fully seats

Put the dipstick back into the pipe that is connected to the oil reservoir in a careful and deliberate manner.
Continue to press it all the way down until it has been fully reinserted. Pull it back out of the way, clean it off, and give it another shot if it gets rattled or snagged along the way.
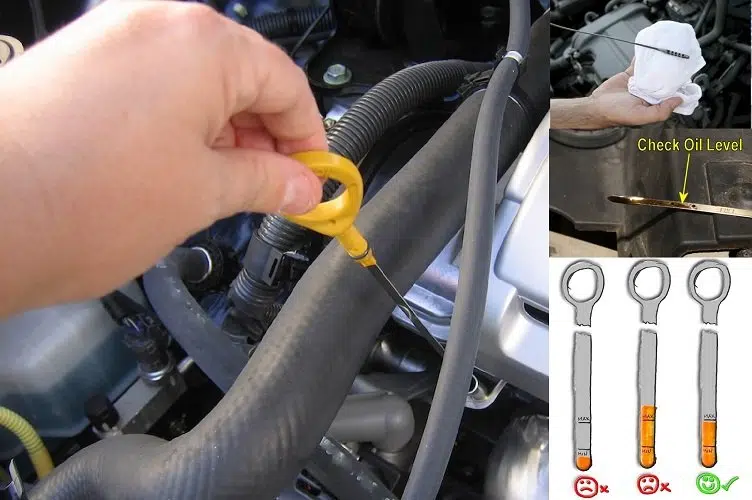
4. Pull out the dipstick again

Examine the tip of the dipstick to identify the point at which the oil layer disappears. The word “ADD” will be written toward the end of the stick, and the word “FULL” will be written toward the center.

- If the oil film is anywhere between the HIGH line and the LOW line, you need to apply more oil.
- It is not necessary to apply any more oil just yet because the oil film is almost up to the FULL line.

It is essential to perform an inspection on the state of the engine lubricant. Checking the color of the oil is important because its age can be deduced from its composition as well as its color.

Because the color of oil will gradually shift from golden to brown, and then ultimately to black, normal oil should have the appearance of either brown or black.
- Oil looks fairly clear like golden honey: Good condition
- Dark brown to black oil: Needs to be replaced.
FRIENDLY REMIND: If it appears to be milky and light in color, this may indicate that coolant is getting into the engine through a breach. In this particular scenario, having a qualified technician examine your vehicle’s engine is an absolute must.
5. Reinsert the dipstick

That is all 5 steps for checking your car engine oil. Here are some tips I have collected:
- You will observe that new cars use very little oil compared to older models. The levels in these vehicles do not change, but you should check the oil level in older cars once a week as a safety measure.
- You can also check the oil in your car before you’ve actually driven it. One good time to do this is right after you wake up in the morning, after your vehicle has been able to relax in the driveway and after it hasn’t been driven for a while.
- Verify that these instructions are compatible with the make and model of your vehicle by looking it up in the owner’s handbook.

In conclusion, an investment of only one minute can maintain your car in good health and ensure that it runs smoothly. Maintaining a healthy engine and maximizing the number of kilometers that can be driven on it are both dependent on routinely checking the level of oil in the vehicle’s engine. I really hope that this article can help you understand the significance of checking the oil in your car’s engine as well as the procedure involved in doing so. When you go to load up your tank with gas the next time, don’t forget to take a few minutes to check the oil level and the condition of the oil in your engine.
I hope you have a safe and successful drive!